Smart Buoy — Making Wave and Temperature Measurements 🌊🌡️

A tech focused education and services company.
This Smart Buoy series charts our (ambitious) attempt to build a scientific buoy that can take meaningful measurements about the sea using off-the-shelf products. This is tutorial one of four. If you need a swift introduction to the project, check out our summary.
In this tutorial, we show you how we took wave and temperature measurements on our Smart Buoy. Be warned, this tutorial is pretty code-heavy, so if you’re here for a good time not for a long time, check out our summary first to get a nice brief overview before enjoying this in-depth look.
Supplies
Arduino Nano — Amazon
GY-86 (accelerometer, gyroscope, barometer, compass) — Amazon
Water Temperature sensor — Amazon
🔗 Get The Smart Buoy Code On Github 📔
Tutorial 🤖
Accelerometer & Gyroscope
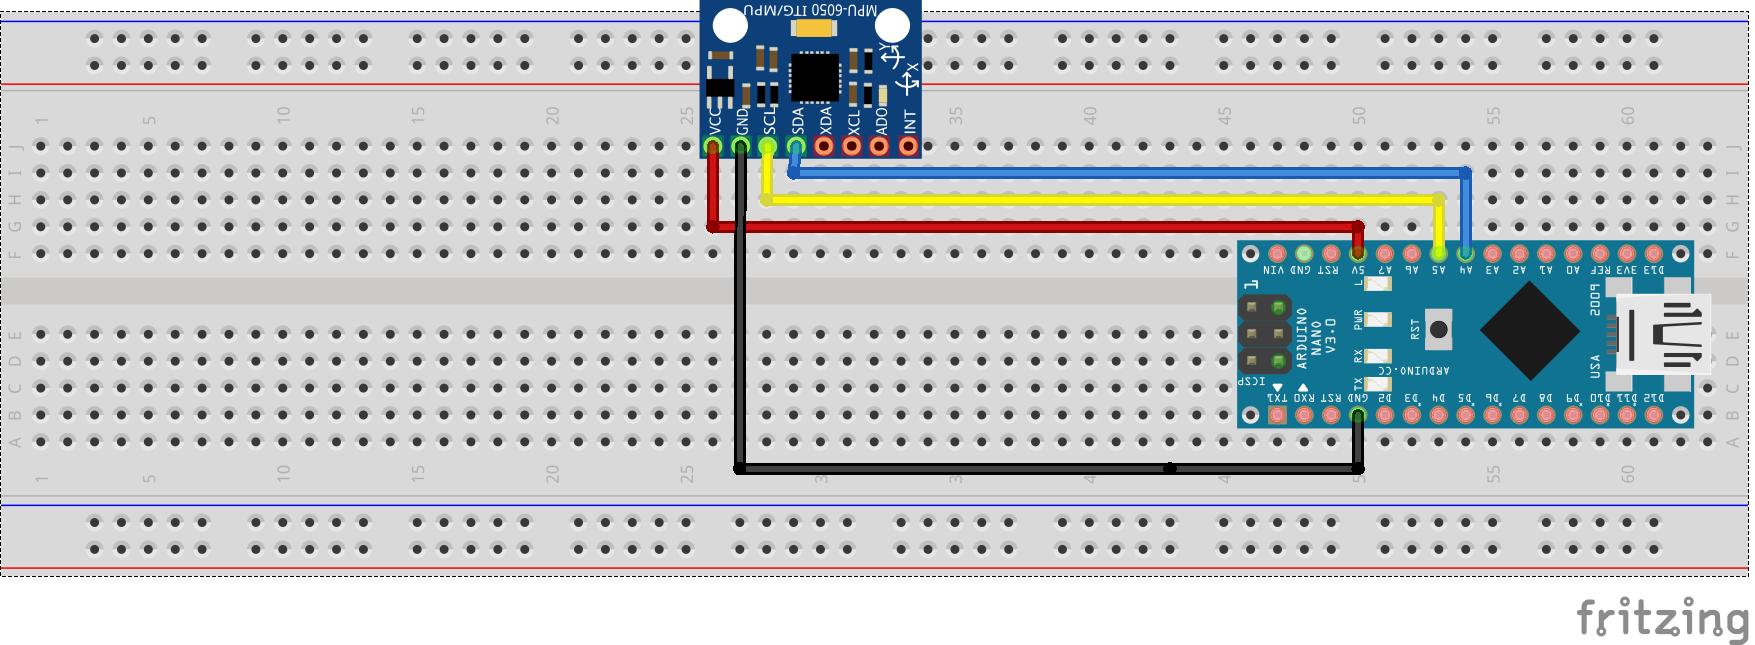
The main sensor on the buoy is a GY-86, which contains the MPU6050 accelerometer gyroscope, the HMC5883L Magnetometer and the MS5611 barometer. These sensors enable us to measure air temperature, wave height, wave period and wave energy (and wave direction if someone out there is smart enough to help us with the maths).
The GY-86 communicates via i2C — see the schematic. This is the code we used to access the accelerometer and gyroscope readings.
#include "Wire.h"
#include "I2Cdev.h" //   Get these libraries from https://github.com/jrowberg/i2cdevlib/tree/master/Arduino
#include "MPU6050.h" //  ^


MPU6050 mpu;

int16_t ax, ay, az;
int16_t gx, gy, gz;

void setup() {
  Serial.begin(115200);
  Wire.begin();
  Serial.println("Initializing MP6050...");
  mpu.initialize();
  Serial.println(mpu.testConnection() ? "MPU6050 connection successful" : "MPU6050 connection failed");

}

void loop() {
  mpu.getMotion6(&ax, &ay, &az, &gx, &gy, &gz);
  printResults();
  delay(10);
}

void printResults(){
  Serial.print("Acc (x,y,z) m/s/s: ");
  Serial.print(ax); Serial.print(" ");
  Serial.print(ay); Serial.print(" ");
  Serial.print(az);
  Serial.print(" Gyro(x,y,z) °/s: ");
  Serial.print(gx); Serial.print(" ");
  Serial.print(gy); Serial.print(" ");
  Serial.println(gz);
}
Magnetometer (Compass)
The GY-86 contains a magnetometer which we used as a compass. You don’t need to change any connections — woo! The code to get the compass value is available below.
Remember to use the value of declination specific for your location, otherwise your results may be inaccurate.
#include "Wire.h"
#include "I2Cdev.h" //   Get these libraries from https://github.com/jrowberg/i2cdevlib/tree/master/Arduino
#include "MPU6050.h" //  ^
#include "HMC5883L.h" // ^

MPU6050 mpu;
HMC5883L mag;

int16_t mx, my, mz;

// Find the declination where you are from http://www.magnetic-declination.com
//                  -14°     59'
float declination = (-14.0 - (59.0 / 60.0)) * (PI/180);

void setup() {
  Serial.begin(115200);
  Wire.begin();
  Serial.println("Initializing I2C devices...");
  mpu.setI2CMasterModeEnabled(false);
  mpu.setI2CBypassEnabled(true) ;
  mpu.setSleepEnabled(false);
  mpu.initialize();
  mag.initialize();
  Serial.println(mpu.testConnection() ? "MPU6050 connection successful" : "MPU6050 connection failed");
  Serial.println(mag.testConnection() ? "HMC5883L connection successful" : "HMC5883L connection failed");

}

void loop() {
  mag.getHeading(&mx, &my, &mz);
  printResults();
  delay(200);
}

void printResults(){
  float heading = atan2(my, mx);
  heading += declination;
  if (heading < 0) heading += 2 * PI;
  if (heading > 2 * PI) heading -= 2 * PI;
  heading *= 180/M_PI;

  Serial.print("Heading °:");
  Serial.println(heading);
}
Barometer and Temperature
Here’s how to get the values from the MS5611 barometer.
#include "Wire.h"
#include "I2Cdev.h" //   Get these libraries from https://github.com/jrowberg/i2cdevlib/tree/master/Arduino
#include "MPU6050.h" //  ^
#include <MS5611.h> // Get this library from https://github.com/jarzebski/Arduino-MS5611

MPU6050 mpu;
MS5611 baro;

double temp;
long pressure;
double altitude;

void setup() {
  Serial.begin(115200);
  Wire.begin();
  Serial.println("Initializing I2C devices...");
  mpu.setI2CMasterModeEnabled(false);
  mpu.setI2CBypassEnabled(true) ;
  mpu.setSleepEnabled(false);
  mpu.initialize();
  Serial.println(mpu.testConnection() ? "MPU6050 connection successful" : "MPU6050 connection failed");
  while (!baro.begin(MS5611_ULTRA_HIGH_RES)) {
    Serial.println("MS5611 connection unsuccessful, check wiring!");
    delay(500);
  }
}

void loop() {
  temp = baro.readTemperature(true);
  pressure = baro.readPressure(true);
  altitude = baro.getAltitude(pressure);
  printResults();
  delay(200);
}

void printResults(){
  Serial.print("Pressure hPa: "); Serial.print(pressure);
  Serial.print("  Altitude m: "); Serial.print(altitude);
  float tempC = temp / 340.00 + 36.53;
  Serial.print("  Temp °C: "); Serial.println(tempC);
}
[Crude] Wave Height
Once all those sensors are set up, you can use them to measure wave properties, starting with wave height…
The altitude of the Buoy can be calculated using air pressure. We used the relative altitude of the Buoy over a time period to work out the wave height like this:
#include "Wire.h"
#include "I2Cdev.h" //   Get these libraries from https://github.com/jrowberg/i2cdevlib/tree/master/Arduino
#include "MPU6050.h" //  ^
#include <MS5611.h> // Get this library from https://github.com/jarzebski/Arduino-MS5611

MPU6050 mpu;
MS5611 baro;

long pressure;
double altitude, min_height, max_height, wave_height;

void setup() {
  Serial.begin(115200);
  Wire.begin();
  Serial.println("Initializing I2C devices...");
  mpu.setI2CMasterModeEnabled(false);
  mpu.setI2CBypassEnabled(true) ;
  mpu.setSleepEnabled(false);
  mpu.initialize();
  Serial.println(mpu.testConnection() ? "MPU6050 connection successful" : "MPU6050 connection failed");
  while (!baro.begin(MS5611_ULTRA_HIGH_RES)) {
    Serial.println("MS5611 connection unsuccessful, check wiring!");
    delay(500);
  }
}

void loop() {
  unsigned long start_time = millis();
  pressure = baro.readPressure(true);
  altitude = baro.getAltitude(pressure);
  max_height = altitude;
  min_height = altitude;

  //  for 5 seconds
  while(millis() - start_time < 5000){
    pressure = baro.readPressure(true);
    altitude = baro.getAltitude(pressure);
    if (altitude < min_height) min_height = altitude;
    if (altitude > max_height) max_height = altitude;
  }
  wave_height = (max_height - min_height)/2.0;
  Serial.print("Wave Height m: "); Serial.println(wave_height);
}
[Crude] Wave Period
Next, wave period. We used airy wave theory — a lovely basic wave theory which says that water surface waves can be described as sine waves. It’s great to use because it makes the maths easier, but it is of course a simplification and does have certain caveats, including that it is inaccurate in shallower water where waves transform and break.
Using the midpoint between our maximum and minimum relative altitudes and finding how frequently the Buoy crossed this point, we figured we would be able to get a value for wave period.
#include "Wire.h"
#include "I2Cdev.h" //   Get these libraries from https://github.com/jrowberg/i2cdevlib/tree/master/Arduino
#include "MPU6050.h" //  ^
#include <MS5611.h> // Get this library from https://github.com/jarzebski/Arduino-MS5611

MPU6050 mpu;
MS5611 baro;

long pressure;
double altitude, min_height, max_height, mid_point, smudge_factor;
byte escaped, started;
unsigned long period_start, period_end;
float avg_period = -1;

void setup() {
  Serial.begin(115200);
  Wire.begin();
  Serial.println("Initializing I2C devices...");
  mpu.setI2CMasterModeEnabled(false);
  mpu.setI2CBypassEnabled(true) ;
  mpu.setSleepEnabled(false);
  mpu.initialize();
  Serial.println(mpu.testConnection() ? "MPU6050 connection successful" : "MPU6050 connection failed");
  while (!baro.begin(MS5611_ULTRA_HIGH_RES)) {
    Serial.println("MS5611 connection unsuccessful, check wiring!");
    delay(500);
  }
}

void loop() {
  unsigned long start_time = millis();
  pressure = baro.readPressure(true);
  altitude = baro.getAltitude(pressure);
  max_height = altitude;
  min_height = altitude;

  //  for 5 seconds
  while(millis() - start_time < 5000){
    pressure = baro.readPressure(true);
    altitude = baro.getAltitude(pressure);
    if (altitude < min_height) min_height = altitude;
    if (altitude > max_height) max_height = altitude;
  }
  mid_point = (max_height + min_height)/2.0;
  smudge_factor = (max_height - mid_point)*0.15;
  Serial.print("Mid Point m: "); Serial.print(mid_point);

  start_time = millis();
  //  for 5 seconds
  while(millis() - start_time < 5000){
    pressure = baro.readPressure(true);
    altitude = baro.getAltitude(pressure);
    //    if within a range of 30% of wave height from the mid point
    //    start the timer else stop it
    if (altitude < mid_point + smudge_factor && altitude > mid_point - smudge_factor){
      if ( !started){
        period_start = millis();
        started = true;
      }
      else{
        if ( escaped ){
          // if it has started and escaped and is now returning
          period_end = millis();
          started = false;
          escaped = false;
          // if the variable has already been assigned
          // use its previous value and new value to work out avg
          if(avg_period != -1){
            avg_period = (avg_period + (period_end-period_start)*2)  / 2.0;
          }
          // assign it
          else{
            avg_period =  (period_end-period_start)*2;
          }

        }
      }
    }
    else{
      escaped = true;
    }
  }
  Serial.print("  Period s: "); Serial.println(avg_period/1000);
}
Wave Direction (HELP!)
We never actually managed to measure wave direction.
However, the sensors aboard the Buoy should be able to do it. It is possible to measure dynamic accelerations with the GY-86 Accelerometer by subtracting the affects of the gravitational force. It is also possible to get the direction of this acceleration. Using the direction of Buoy acceleration, along with the compass value for a given position, should allow you to determine wave direction. We gave it a go in the code below.
If someone out there could help us with this it would be amazing ❤
#include "I2Cdev.h"
#include "MPU6050_6Axis_MotionApps20.h"
#include "HMC5883L.h"
#include "Wire.h"
MPU6050 mpu;
HMC5883L mag;

int16_t mx, my, mz;

#define INTERRUPT_PIN 2  // use pin 2 on Arduino Uno & most boards
float declination = -14.0 - (59.0 / 60.0);

// MPU control/status vars
bool dmpReady = false;  // set true if DMP init was successful
uint8_t mpuIntStatus;   // holds actual interrupt status byte from MPU
uint8_t devStatus;      // return status after each device operation (0 = success, !0 = error)
uint16_t packetSize;    // expected DMP packet size (default is 42 bytes)
uint16_t fifoCount;     // count of all bytes currently in FIFO
uint8_t fifoBuffer[64]; // FIFO storage buffer

// orientation/motion vars
Quaternion q;           // [w, x, y, z]         quaternion container
VectorInt16 aa;         // [x, y, z]            accel sensor measurements
VectorInt16 aaReal;     // [x, y, z]            gravity-free accel sensor measurements
VectorInt16 aaWorld;    // [x, y, z]            world-frame accel sensor measurements
VectorFloat gravity;    // [x, y, z]            gravity vector
volatile bool mpuInterrupt = false;     // indicates whether MPU interrupt pin has gone high
void dmpDataReady() {
    mpuInterrupt = true;
}

void setup() {
    Serial.begin(115200);
    Wire.begin();
    Wire.setClock(400000);

    mpu.setI2CMasterModeEnabled(false);
    mpu.setI2CBypassEnabled(true) ;
    mpu.setSleepEnabled(false);
    mpu.initialize();
    mag.initialize();
   // initialize device
    Serial.println(F("Initializing I2C devices..."));
    mpu.initialize();
    pinMode(INTERRUPT_PIN, INPUT);
    Serial.println(mpu.testConnection() ? F("MPU6050 connection successful") : F("MPU6050 connection failed"));
devStatus = mpu.dmpInitialize();
  // supply your own gyro offsets here, scaled for min sensitivity
    mpu.setXGyroOffset(112);
    mpu.setYGyroOffset(5);
    mpu.setZGyroOffset(-15);
    mpu.setZAccelOffset(1487);
    if (devStatus == 0) {
        mpu.setDMPEnabled(true);
        Serial.print(digitalPinToInterrupt(INTERRUPT_PIN));
        attachInterrupt(digitalPinToInterrupt(INTERRUPT_PIN), dmpDataReady, RISING);
        mpuIntStatus = mpu.getIntStatus();
        dmpReady = true;
        packetSize = mpu.dmpGetFIFOPacketSize();
    }

}

void loop() {
    if (!dmpReady) return;
    while (!mpuInterrupt && fifoCount < packetSize) {
        if (mpuInterrupt && fifoCount < packetSize) {
          fifoCount = mpu.getFIFOCount();
        }
    }
    mpuInterrupt = false;
    mpuIntStatus = mpu.getIntStatus();
    fifoCount = mpu.getFIFOCount();
    if ((mpuIntStatus & _BV(MPU6050_INTERRUPT_FIFO_OFLOW_BIT)) || fifoCount >= 1024) {
        mpu.resetFIFO();
        fifoCount = mpu.getFIFOCount();
    }
    else if (mpuIntStatus & _BV(MPU6050_INTERRUPT_DMP_INT_BIT)) {
        while (fifoCount < packetSize) fifoCount = mpu.getFIFOCount();
        mpu.getFIFOBytes(fifoBuffer, packetSize);
        fifoCount -= packetSize;

      // OUTPUT_READABLE_WORLDACCEL
      mpu.dmpGetQuaternion(&q, fifoBuffer);
      mpu.dmpGetAccel(&aa, fifoBuffer);
      mpu.dmpGetGravity(&gravity, &q);
      mpu.dmpGetLinearAccel(&aaReal, &aa, &gravity);
      mpu.dmpGetLinearAccelInWorld(&aaWorld, &aaReal, &q);
      Serial.print("Acceleration (x,y) m/s/s: ");
      Serial.print(aaWorld.x);
      Serial.print("  ");
      Serial.println(aaWorld.y);

     // Find the angle of acceleration
      //  double angle_of_acc = atan2(aaWorld.y, aaWorld.x);
      //  angle_of_acc *= 180/M_PI;

      // Get compass heading
      // mag.getHeading(&mx, &my, &mz);
      // float heading = atan2(my, mx);
      // if (heading < 0) heading += 2 * PI;
      // if (heading > 2 * PI) heading -= 2 * PI;
      // heading *= 180/M_PI;
      // heading += declination;

      // Offset angle of acceleration by the heading angle
      // wave_direction = angle_off_acc + heading

    }
}
[Crude] Wave Energy
One way of defining wave energy is using this friendly equation:
](https://cdn-images-1.medium.com/max/2000/1*C0kJEOTMQJJIq-4IJQqIlQ.png) *
*
Wave Power — Source*
Using our values for wave period and height, we are able to calculate wave energy like this:
// Wave power formula:  P = 0.5 height ** 2 * period // https://en.wikipedia.org/wiki/Wave_power
#include "Wire.h"
#include "I2Cdev.h" //   Get these libraries from https://github.com/jrowberg/i2cdevlib/tree/master/Arduino
#include "MPU6050.h" //  ^
#include <MS5611.h> // Get this library from https://github.com/jarzebski/Arduino-MS5611

MPU6050 mpu;
MS5611 baro;

long pressure;
double altitude, min_height, max_height, wave_height, mid_point, smudge_factor, wave_power;
byte escaped, started;
unsigned long period_start, period_end;
float avg_period = -1;


void setup() {
  Serial.begin(115200);
  Wire.begin();
  Serial.println("Initializing I2C devices...");
  mpu.setI2CMasterModeEnabled(false);
  mpu.setI2CBypassEnabled(true) ;
  mpu.setSleepEnabled(false);
  mpu.initialize();
  Serial.println(mpu.testConnection() ? "MPU6050 connection successful" : "MPU6050 connection failed");
  while (!baro.begin(MS5611_ULTRA_HIGH_RES)) {
    Serial.println("MS5611 connection unsuccessful, check wiring!");
    delay(500);
  }
}

void loop() {
  unsigned long start_time = millis();
  pressure = baro.readPressure(true);
  altitude = baro.getAltitude(pressure);
  max_height = altitude;
  min_height = altitude;

  //  for 5 seconds
  while(millis() - start_time < 5000){
    pressure = baro.readPressure(true);
    altitude = baro.getAltitude(pressure);
    if (altitude < min_height) min_height = altitude;
    if (altitude > max_height) max_height = altitude;
  }
  mid_point = (max_height + min_height)/2.0;
  wave_height = (max_height - mid_point) / 2.0;
  smudge_factor = wave_height * 0.15;
  Serial.print("Wave Height m: "); Serial.print(wave_height);

  start_time = millis();
  //  for 5 seconds
  while(millis() - start_time < 5000){
    pressure = baro.readPressure(true);
    altitude = baro.getAltitude(pressure);
    //    if within a range of 30% of wave height from the mid point
    //    start the timer else stop it
    if (altitude < mid_point + smudge_factor && altitude > mid_point - smudge_factor){
      if ( !started){
        period_start = millis();
        started = true;
      }
      else{
        if ( escaped ){
          // if it has started and escaped and is now returning
          period_end = millis();
          started = false;
          escaped = false;
          // if the variable has already been assigned
          // use its previous value and new value to work out avg
          if(avg_period != -1){
            avg_period = (avg_period + (period_end-period_start)*2)  / 2.0;
          }
          // assign it
          else{
            avg_period =  (period_end-period_start)*2;
          }

        }
      }
    }
    else{
      escaped = true;
    }
  }
  Serial.print("  Period s: "); Serial.print(avg_period/1000);
  wave_power = (0.5 * wave_height * wave_height * avg_period / 1000);
  Serial.print("  Wave Power kW/m: "); Serial.println(wave_power);
}
Water Temperature
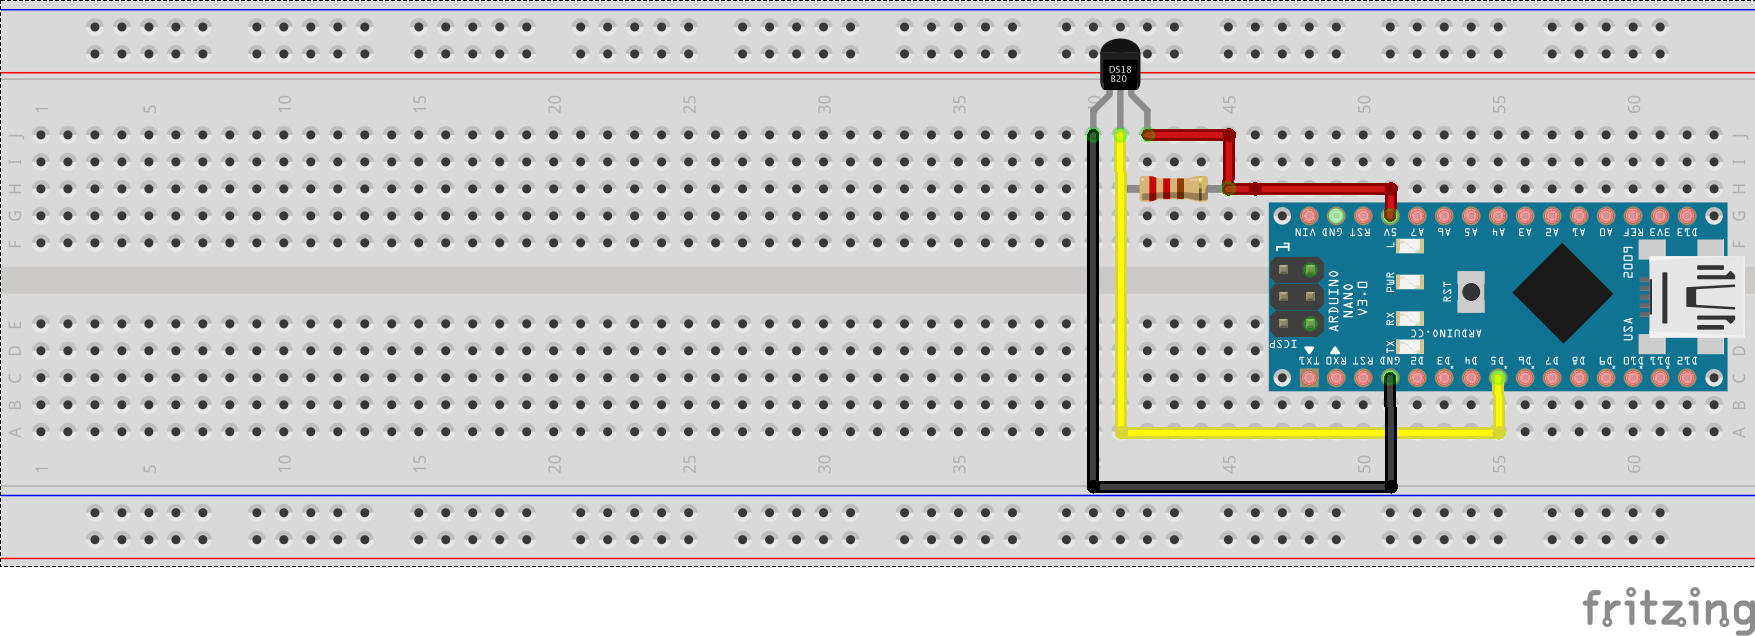
Finally, we wanted to be able to measure water temperature. The DS18B20 water temperature sensor protrudes from the bottom of the Buoy into the sea and the Arduino communicates with it using 1-wire.
The only modification we made was adding a pull-up resistor on the signal wire, and then we were able to talk to it like this:
#include <onewire.h>
#include <dallastemperature.h>

OneWire oneWire(6);
DallasTemperature sensors(&oneWire);
float water_temperature;

void setup() {
  Serial.begin(115200);
  sensors.begin();
}

void loop() {
  sensors.requestTemperatures();
  water_temperature = sensors.getTempCByIndex(0);
  Serial.print("Water temperature C "); Serial.println(water_temperature);
  delay(200);
}
🔗 Get The Smart Buoy Code On Github 📔
Thanks For Reading
Thanks for reading this tutorial, this has been the first step in building our Smart Buoy. Buckle up for the next tutorials!
Part 1: Making wave and temperature measurements
Part 2: GPS, Radio (NRF24) and SD Card Module
Part 3: Scheduling Power to the Buoy
Part 4: Waterproofing, Dashboards and Deploy!
We hope you enjoyed this article. If you like the style, check out T3chFlicks.org for more tech-focused educational content as well as all the fun stuff we do on YouTube (Instagram, Facebook, Twitter).


