Smart Buoy — GPS, Radio (NRF24) and a SD Card Module 📍📡💾

A tech focused education and services company.
This Smart Buoy series charts our (ambitious) attempt to build a scientific buoy that can take meaningful measurements about the sea using off-the-shelf products. This is tutorial two of four — make sure you’re up to date, and if you need a swift introduction to the project, check out our summary.
Part 1: Making wave and temperature measurements
In this tutorial, we show show you how to get GPS data, store it on an SD card and send it somewhere using radio.
We did this so we could keep track of the location of our seaborne Buoy. The radio means that we can watch it remotely and the SD card means that on the off chance something breaks and it goes for a wander, we can download the data it collected during its unplanned excursion — if we’re ever able to retrieve it!
Supplies
GPS module — Amazon
SD card module — Amazon
SD card — Amazon
2 X Radio modules (NRF24L01+) — Amazon
2 X Arduino — Amazon
🔗 Get The Smart Buoy Code On Github 📔
Tutorial🤖
Getting GPS Data
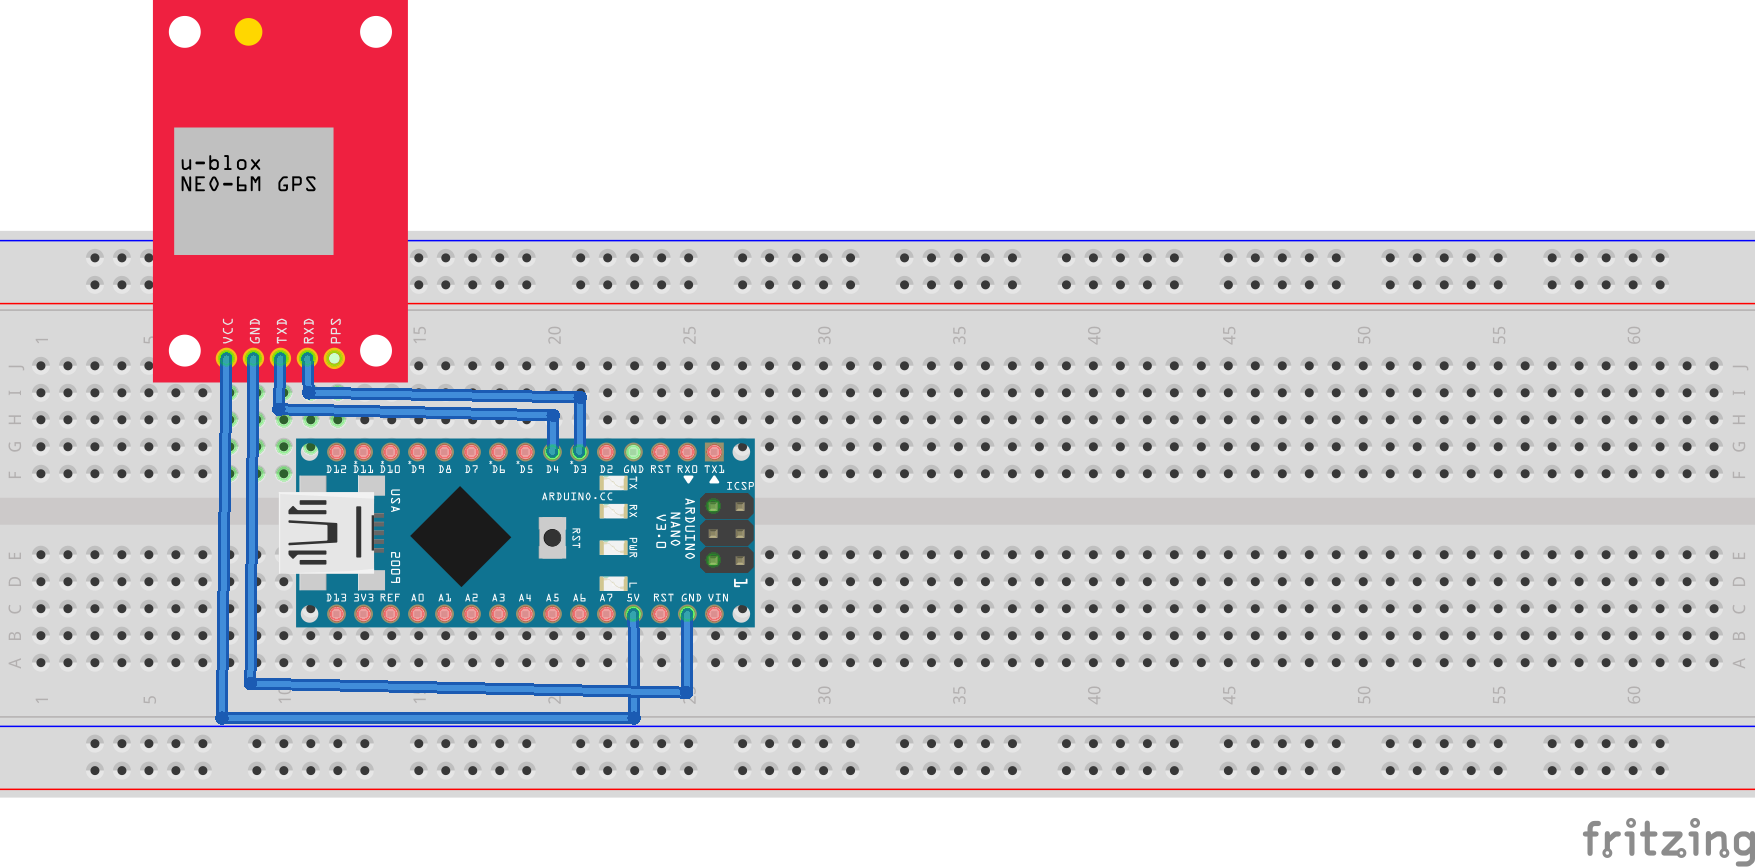
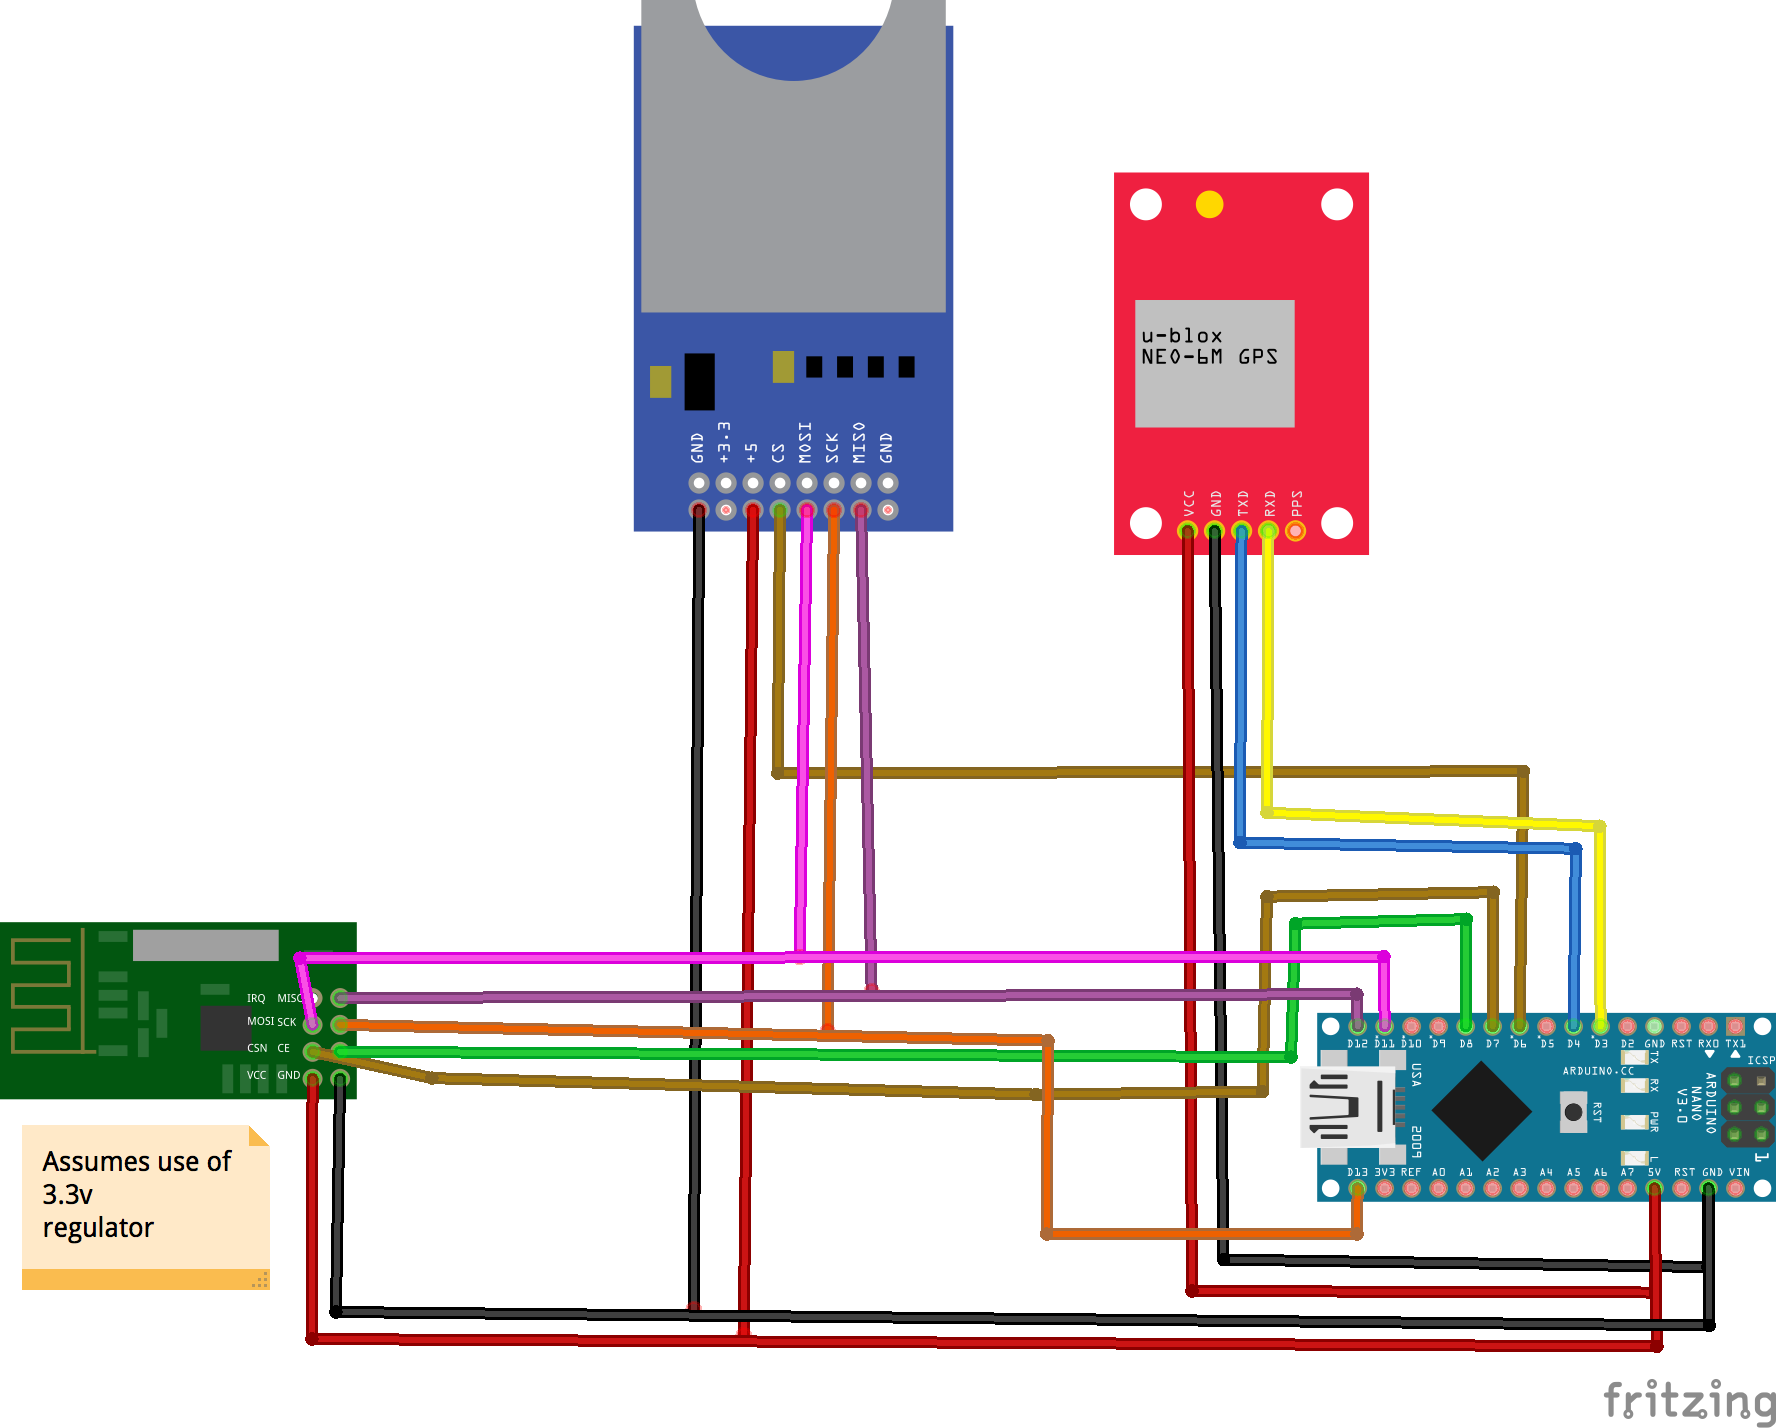
The Smart Buoy takes sensor measurements as it sits in the sea, including GPS location and datetime. Take a look at the schematic below, which shows how we set up the circuit. The GPS module communicates via serial connection, so we used the Arduino software serial library as well as the tiny GPS library to communicate with it. These libraries (we’ll all be glad to hear) make everything super simple.
#include <TinyGPS++.h>
#include <SoftwareSerial.h>

TinyGPSPlus gps;
SoftwareSerial ss(4, 3);

struct dataStruct{
  double latitude;
  double longitude;
  unsigned long date;
  unsigned long time;
}gpsData;

void setup()
{
  Serial.begin(115200);
  ss.begin(9600);
}

void loop()
{
  while (ss.available() > 0){
    if (gps.encode(ss.read())){
      getInfo();
      printResults();
    }
  }
}

void getInfo(){
  if (gps.location.isValid()){
    gpsData.latitude = gps.location.lat();
    gpsData.longitude = gps.location.lng();
  }
  else{
    Serial.println("Invalid location");
  }
  if (gps.date.isValid()){
    gpsData.date = gps.date.value();
  }
  else{
    Serial.println("Invalid date");
  }
  if (gps.time.isValid()){
    gpsData.time = gps.time.value();
  }
  else{
    Serial.println("Invalid time");
  }
}

void printResults(){
  Serial.print("Location: ");
  Serial.print(gpsData.latitude, 6); Serial.print(", "); Serial.print(gpsData.longitude, 6);
  Serial.print("  Date: ");
  Serial.print(gpsData.date);
  Serial.print("  Time: ");
  Serial.print(gpsData.time);
  Serial.println();
}
Sending GPS Data Via Radio
If the Buoy is out at sea taking measurements, there may be instances where we want to access its data without getting our feet wet or bringing it ashore. To get the measurements remotely, we used a radio module connected to an Arduino on both sides of the communication. In future, we hope to replace the receiver-side Arduino with a raspberry pi. The radio works similarly with both these interfaces, so swapping them over is pretty straightforward.
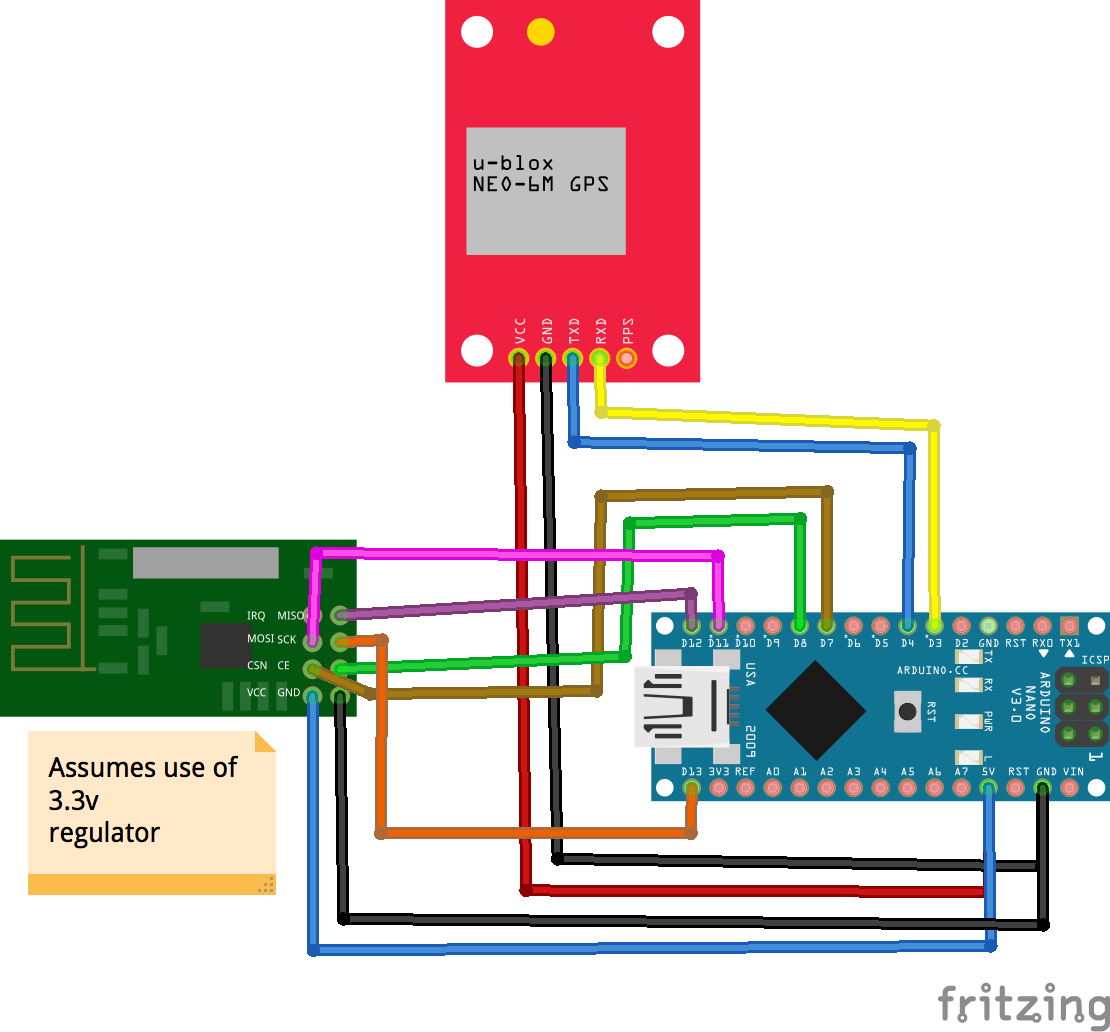
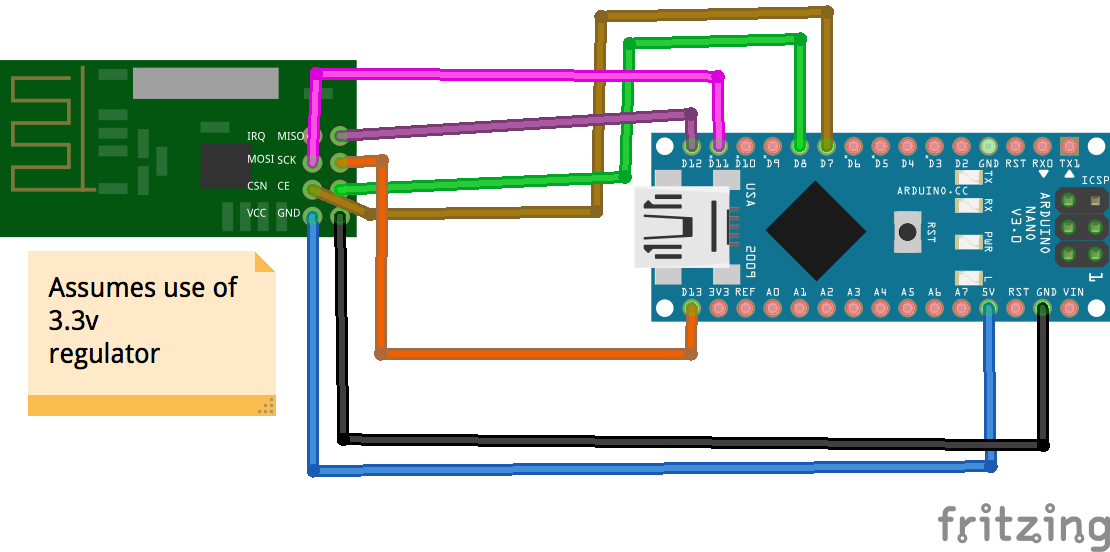
The radio module communicates using SPI, which requires a few more connections than I2C but is still really easy to use because of the NRF24 library. Using the GPS module for the sensor measurements, we transmitted its data from one Arduino to the other. We connected up the GPS and radio module to the Arduino and on the other side an Arduino with the radio module — have a look at the schematic.
Transmitter
#include <SPI.h>
#include <nRF24L01.h>
#include <RF24.h>
#include <TinyGPS++.h>
#include <SoftwareSerial.h>

TinyGPSPlus gps;

SoftwareSerial ss(4, 3);
RF24 radio(8, 7); // CE, CSN

struct dataStruct{
  double latitude;
  double longitude;
  unsigned long date;
  unsigned long time;
}gpsData;

void setup() {
  Serial.begin(115200);
  ss.begin(9600);

  Serial.println("Setting up radio");
  //  Setup transmitter radio
  radio.begin();
  radio.openWritingPipe(0xF0F0F0F0E1LL);
  radio.setChannel(0x76);
  radio.setPALevel(RF24_PA_MAX);
  radio.setDataRate(RF24_250KBPS);
  radio.stopListening();
  radio.enableDynamicPayloads();
  radio.powerUp();
  Serial.println("Starting to send");
}


void loop() {
  while (ss.available() > 0){
    if (gps.encode(ss.read())){
      getInfo();
      radio.write(&gpsData, sizeof(gpsData));
    }
  }
}


void getInfo(){
  if (gps.location.isValid()){
    gpsData.longitude = gps.location.lng();
    gpsData.latitude = gps.location.lat();
  }
  else{
    gpsData.longitude = 0.0;
    gpsData.latitude = 0.0;
  }
  if (gps.date.isValid()){
    gpsData.date = gps.date.value();
  }
  else{
    gpsData.date = 0;
  }
  if (gps.time.isValid()){
    gpsData.time = gps.time.value();
  }
  else{
    gpsData.time = 0;
  }
}
Receiver
#include <SPI.h>
#include <nRF24L01.h>
#include <RF24.h>


RF24 radio(8, 7); // CE, CSN

struct dataStruct{
  double latitude;
  double longitude;
  unsigned long date;
  unsigned long time;
}gpsData;

void setup() {
  Serial.begin(115200);
  //  Setup receiver radio
  radio.begin();
  radio.openReadingPipe(1, 0xF0F0F0F0E1LL);
  radio.setChannel(0x76);
  radio.setPALevel(RF24_PA_MAX);
  radio.setDataRate(RF24_250KBPS);
  radio.startListening();
  radio.enableDynamicPayloads();
  radio.powerUp();
}


void loop() {
  if (radio.available()) {
    radio.read(&gpsData, sizeof(gpsData));
    Serial.print("Location: ");
    Serial.print(gpsData.latitude, 6);
    Serial.print(", ");
    Serial.print(gpsData.longitude, 6);
    Serial.print("  Date: ");
    Serial.print(gpsData.date);
    Serial.print("  Time: ");
    Serial.print(gpsData.time);
    Serial.println();

  }
}
Storing Data Using an SD Card Module
While the radio module was quite reliable, we decided it was best to have a built-in contingency in case there was a power cut on the receiver side, or the module moved out of range. Our contingency plan was an SD card module which allowed us to store the data collected. The quantity of data being collected wasn’t that large, so even a small SD card would easily be able to store a day’s worth of data.
#include <SPI.h>
#include <SD.h>
#include <TinyGPS++.h>
#include <SoftwareSerial.h>

TinyGPSPlus gps;

SoftwareSerial ss(4, 3);

struct dataStruct{
  double latitude;
  double longitude;
  unsigned long date;
  unsigned long time;
}gpsData;


void setup() {
  Serial.begin(115200);
  ss.begin(9600);

  if (!SD.begin(5)) {
    Serial.println("Card failed, or not present");
    return;
  }
  Serial.println("card initialized.");

  File dataFile = SD.open("gps_data.csv", FILE_WRITE);
  if (dataFile) {
    dataFile.println("Latitude, Longitude, Date, Time");
    dataFile.close();
  }
  else{
    Serial.println("nope cant open file");
  }
}


void loop() {
  while (ss.available() > 0){
    if (gps.encode(ss.read())){
      getInfo();
      printResults();
      saveInfo();
    }
  }
}


void getInfo(){
  if (gps.location.isValid()){
    gpsData.latitude = gps.location.lat();
    gpsData.longitude = gps.location.lng();
  }
  else{
    Serial.println("Invalid location");
  }
  if (gps.date.isValid()){
    gpsData.date = gps.date.value();
  }
  else{
    Serial.println("Invalid date");
  }
  if (gps.time.isValid()){
    gpsData.time = gps.time.value();
  }
  else{
    Serial.println("Invalid time");
  }
}


void printResults(){
  Serial.print("Location: ");
  Serial.print(gpsData.latitude, 6); Serial.print(", "); Serial.print(gpsData.longitude, 6);
  Serial.print("  Date: ");
  Serial.print(gpsData.date);
  Serial.print("  Time: ");
  Serial.print(gpsData.time);
  Serial.println();
}

void saveInfo(){
 File dataFile = SD.open("gps_data.csv", FILE_WRITE);
  if (dataFile) {
    dataFile.print(gpsData.latitude);
    dataFile.print(", ");
    dataFile.print(gpsData.longitude);
    dataFile.print(", ");
    dataFile.print(gpsData.date);
    dataFile.print(", ");
    dataFile.println(gpsData.time);
    dataFile.close();
  }
  else{
    Serial.println("nope no datafile");
  }
}
Sadly, we had massive problems with the SD card. It just wouldn’t work, it caused us a lot of grief and in the end, we scrapped it. This meant we didn’t have a contingency plan…ah, the best laid plans…
Sending and Storing GPS Data
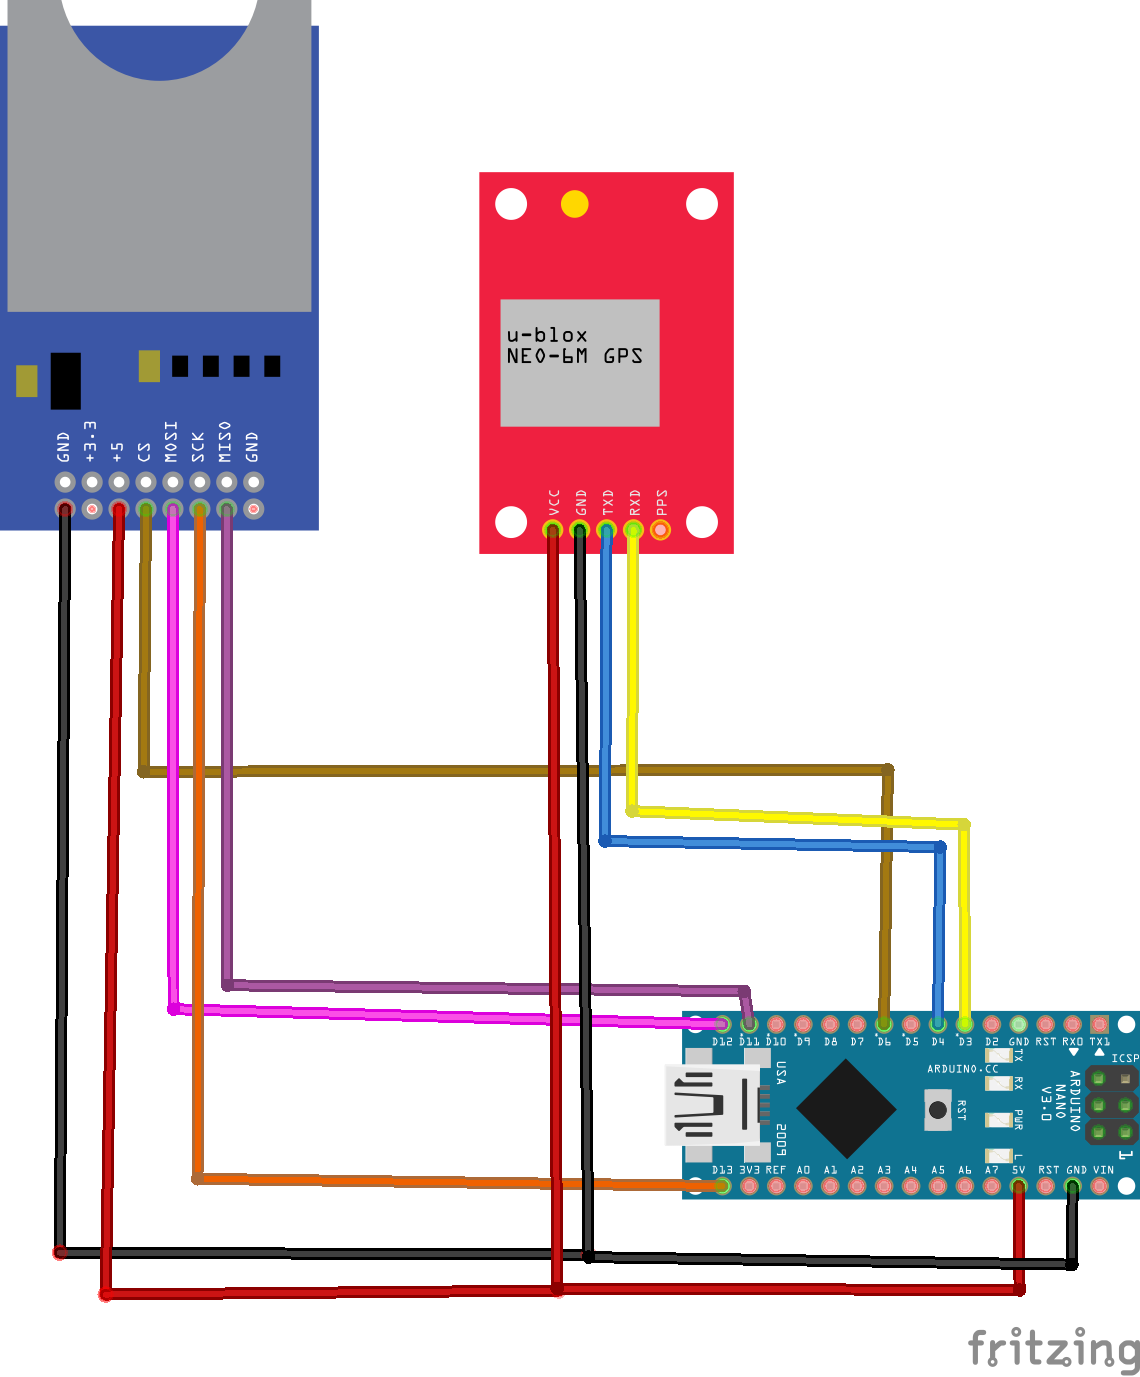
To both send and store data, we had multiple SPI devices which attempted to communicate with the Arduino. The SPI protocol allows multiple devices to share the same MISO and MOSI and SCK connections and select a specific device using the ChipSelect (CS) connection per device. This is usually hidden from the user in most Arduino libraries.
The following code and circuits allow you to make GPS measurements and save them to an SD card whilst also sending to another Arudino via the radio module.
Transmitter
#include <SPI.h>
#include <nRF24L01.h>
#include <RF24.h>
#include <TinyGPS++.h>
#include <SoftwareSerial.h>
#include <SD.h>

TinyGPSPlus gps;


SoftwareSerial ss(4, 3);
RF24 radio(8, 7); // CE, CSN

struct dataStruct{
  double latitude;
  double longitude;
  unsigned long date;
  unsigned long time;
}gpsData;

void setup() {
  Serial.begin(115200);
  ss.begin(9600);

  //  Setup transmitter radio
  radio.begin();
  radio.openWritingPipe(0xF0F0F0F0E1LL);
  radio.setChannel(0x76);
  radio.setPALevel(RF24_PA_MAX);
  radio.setDataRate(RF24_250KBPS);
  radio.stopListening();
  radio.enableDynamicPayloads();
  radio.powerUp();

  if (!SD.begin(5)) {
    Serial.println("Card failed, or not present");
    return;
  }
  Serial.println("card initialized.");

  File dataFile = SD.open("gps_data.csv", FILE_WRITE);
  if (dataFile) {
    dataFile.println("Latitude, Longitude, Date, Time");
    dataFile.close();
  }
  else{
    Serial.println("nope cant open file");
  }
}


void loop() {
  while (ss.available() > 0){
    if (gps.encode(ss.read())){
      getInfo();
      sendInfo();
      saveInfo();
    }
  }
}

void getInfo(){
  if (gps.location.isValid()){
    gpsData.latitude = gps.location.lat();
    gpsData.longitude = gps.location.lng();
  }
  else{
    Serial.println("Invalid location");
  }
  if (gps.date.isValid()){
    gpsData.date = gps.date.value();
  }
  else{
    Serial.println("Invalid date");
  }
  if (gps.time.isValid()){
    gpsData.time = gps.time.value();
  }
  else{
    Serial.println("Invalid time");
  }
}


void saveInfo(){
 File dataFile = SD.open("gps_data.csv", FILE_WRITE);
  if (dataFile) {
    dataFile.print(gpsData.latitude);
    dataFile.print(", ");
    dataFile.print(gpsData.longitude);
    dataFile.print(", ");
    dataFile.print(gpsData.date);
    dataFile.print(", ");
    dataFile.println(gpsData.time);
    dataFile.close();
  }
  else{
    Serial.println("nope no datafile");
  }
}

void sendInfo(){
  radio.write(&gpsData, sizeof(gpsData));
}
Thanks For Reading
Thanks for reading this tutorial, this has been the second step in building our Smart Buoy. Check out our next tutorial to see how we schedule power to the system using solar panels, 18650 batteries and RTC module timing circuits.
Part 1: Making wave and temperature measurements
Part 2: GPS, Radio (NRF24) and SD Card Module
Part 3: Scheduling Power to the Buoy
Part 4: Waterproofing, Dashboards and Deploy!
We hope you enjoyed this article. If you like the style, check out T3chFlicks.org for more tech-focused educational content as well as all the fun stuff we do on YouTube (Instagram, Facebook, Twitter).

